
A great user story is essential for effective communication and collaboration within a development team. A user story should capture the essence of what the user needs and why, providing a clear and concise description of a feature from an end user’s perspective.
A user story typically follows a structured format that includes:
- Role: Describes the user or role for whom the feature is being developed.
- Goal: Specifies what the user wants to accomplish or the benefit they seek from the feature.
- Reason: Explains why the user wants to achieve the goal, providing context for the feature.
The user story format is often expressed as:
- As a [Role or User],
- I want/need [Goal],
- So that [Reason? Why do they want to do this? What’s their benefit/reward?].
This structure helps to capture the user’s perspective, the intended functionality, and the underlying motivation for the feature. Later, I’ll give a specific example of a user story.
Epics
An epic is a big piece of work that can be divided into smaller tasks or user stories. In Agile software development, an epic helps organise and manage work, especially for large projects that can’t be finished in one go. Epics stand for big, overall goals that can be split into smaller, easier-to-handle user stories.
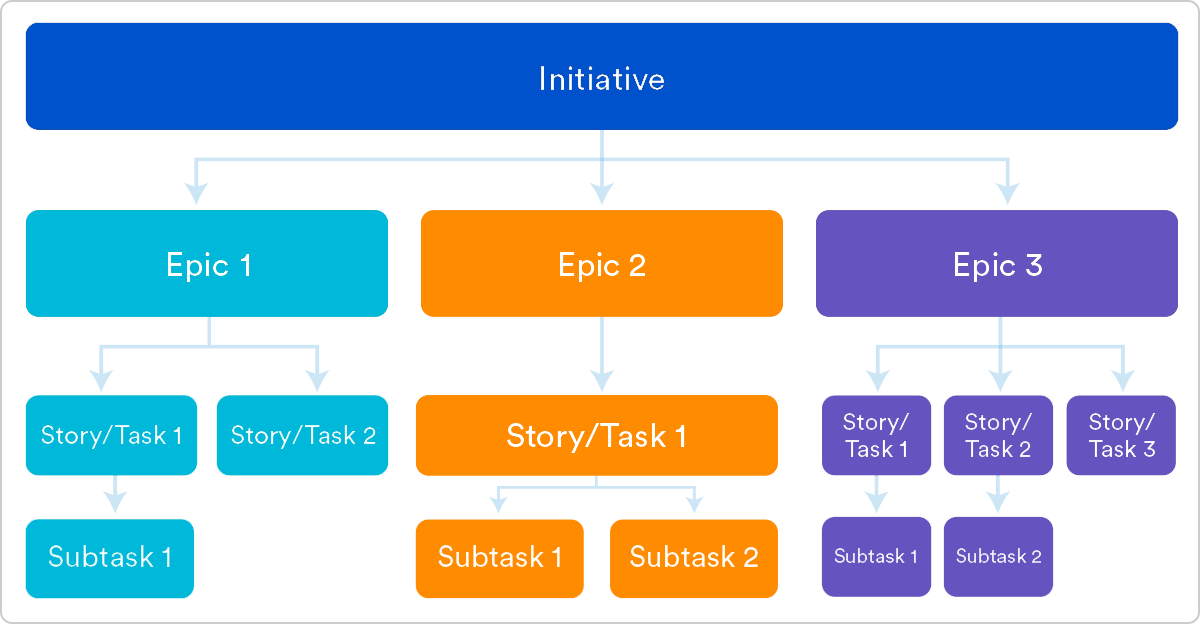 ‘Epics broken down into stories’ an image by Atlassian: https://www.atlassian.com/agile/project-management/epics-stories-themes
Break down epics into user stories using a user story map
When you break down epics into user stories using a user story map, you begin by finding the main user activities or tasks linked to the epic. For each activity or task, you make user stories that show the specific functions or features needed to complete that activity or task. These user stories are then put in order to show the user’s journey or workflow. A user story map can look like this:
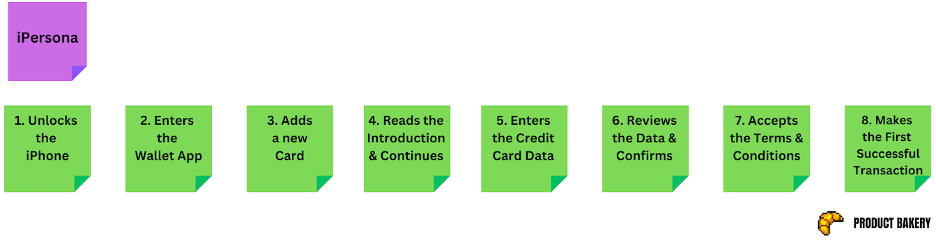 ‘User story map’ an image by Christian Strunk and Product Bakery: https://www.christianstrunk.com/blog/how-to-get-started-with-user-story-mapping
To create a user story map, I like to follow Christian Strunk’s guide or alternatively you can follow this comprehensive guide.
An example of how to bring this all together to communicate with a developer
Writing a good ticket is essential for developers as it provides clear and detailed information about the task, including requirements, acceptance criteria, and any relevant context. A well-written ticket helps developers understand the scope of work, reduces ambiguity, and facilitates efficient and accurate implementation of the task.
Here’s the core structure I like to use with a real-life example:
1. Overview
I add a high-level summary of the work
At the moment, users can pay with Google Pay. We now need to add support for Apple Pay.
2. User story
Following the earlier example in the blog post, I write a user story to ensure the user’s perspective is always kept in mind.
- As a user,
- I need to be able to use Apple Pay at checkout,
- So that I can make secure and convenient payments without needing to enter my credit card details all the time.
3. Acceptance criteria
Clear requirements for a product or feature to be considered finished. They make sure everyone knows what to expect and the quality standards needed, creating a shared understanding of the work’s scope and what will make it satisfying. These can be written as statements or Given/When/Then. I prefer Given/When/Then as it’s helpful for testing and quality assurance.
- The user is at the checkout stage of the shopping process.
- The app or website provides a prominent display of the Apple Pay option.
- The user has added their preferred payment cards to Apple Pay within the app or website.
- The user's device supports the necessary security measures, such as Touch ID or Face ID verification.
- Given that the customer has a supported device with Apple Pay enabled, When they select Apple Pay as the payment method, Then the system should prompt for authentication using Touch ID or Face ID, And upon successful authentication, the transaction should be securely processed.
- Given that the customer has completed a transaction using Apple Pay, When they receive a confirmation of the transaction, Then the confirmation should clearly indicate that Apple Pay was used for the payment, And the transaction details should be accurately reflected in the customer's payment records.
4. Designs
I link to the Figma file or provide a reference design on the ticket itself. Within the designs I ensure the following information is considered: entry/exit points, error states, content and loading screens.
5. Assumptions / Dependencies / Risks
Assumptions are conditions or factors believed to be true but not confirmed. They can include external dependencies, technical constraints, security constraints, or expectations about the work environment.
Assumptions:
- The customer's device supports the necessary security measures, such as Touch ID or Face ID verification, for using Apple Pay.
- The backend systems and infrastructure support the integration and processing of Apple Pay transactions securely and efficiently.
- The customer's financial institution or card issuer supports Apple Pay for the specific payment cards they intend to use.
- The customer has a stable internet connection or cellular service to facilitate the communication required for Apple Pay transactions.
6. Definition of Done
This is a set of criteria that determines when a product increment or project deliverable is considered complete. It encompasses all the necessary steps and quality standards that must be met before an item can be deemed finished and ready for release.
Here’s the checklist I use:
- Code is peer reviewed
- Deployed to test environment
- Tested against acceptance criteria
- Pass smoke test (ensure the product is ready for further testing)
- Pass regression test (has a release broken anything?)
- Feature documented
- Ok by PM and Designer
Deciding whether to label ‘adding Apple Pay’ as a user story or an epic depends on the specific context and scale of the task. If it’s a simple and separate task within a bigger feature set, it can be a user story. However, if it’s complex, affects multiple parts of the system, and needs a lot of effort and time, it might be better as an epic.
Be wary of creating a ticket that is so detailed. It can morph into a larger piece of work, and it suggests that you should break down your ticket further. Ultimately, a ticket should be the starting point to encourage discussions and collaboration between the development team and stakeholders to clarify the user story details and requirements.
